#devops Vsts is now azure devops
Explore tagged Tumblr posts
Visit Tumblr Blog
Explore Tumblr blogs with no restrictions, modern design and the best experience.
Last Seen Tumblr Blogs


Fun Fact
In 2020, 27% of US Tumblr users had an annual household income of over $100,000.
Text
How to Configure an Azure DevOps self hosted Pipeline Agent
Azure DevOps is a tool you can use, for free (with an existing business subscription) that allows you to do a lot of things:
Store code in git repos
Plan projects with a kanban style board
Automate deployments with pipelines
The third option is the most interesting. When you push your code to the repo in Azure DevOps, you can set up a pipeline that will automatically take that code and execute steps you define to deploy it.
An example would be my use case. I write a Terraform plan on my iPad, push it to the Azure DevOps git repo, and the pipeline takes that code and uses it to deploy a new virtual machine on the server in my living room.
Pipeline Punch
Pipelines are not free. You do get some free pipeline hours of execution every month, but if you go over the allotted free tier values it gets very expensive.
One solution to this is to host your own pipeline and connect it to Azure DevOps. This means that instead of paying Microsoft to run this code, you have your own server that does it. This has a few benefits:
You can customize your server’s software
You can customize your server’s connectivity (such as a VPN that connects it to your house!)
You have control over every aspect of the pipeline, and can configure it to your needs!
The pipeline agent doesn’t have to be anything super powerful, depending on what you’re doing. But you can beef it up if you need more power, or you can slim it down to the minimum if you just need something lightweight.
I chose to run my pipeline agent on Digital Ocean. I will now go over the process of configuring a self hosted pipeline agent.
Setting up your own Custom Agent
First, you need a Linux server. I’m using Ubuntu 22.04 hosted on Digital Ocean for $6/month. This guide assumes you know how to install and configure a Linux server, so we won’t be covering that here.
The process is pretty simple. Let’s set up Azure DevOps.
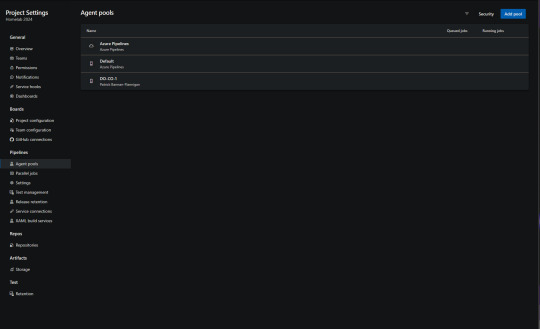
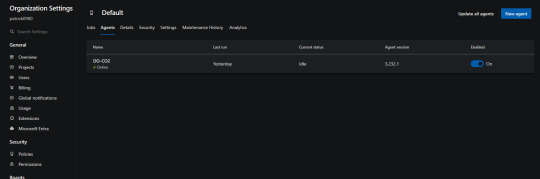
First you will need to navigate to your Azure DevOps instance and click the settings icon in the bottom left hand corner of the screen.
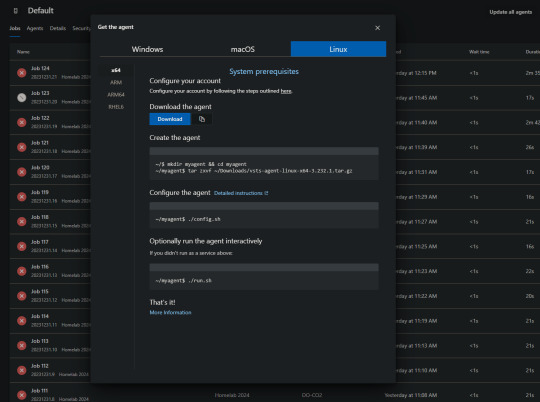
You will then be able to download the agent, or copy the link. If you copy the link, you can simply download the agent on your Linux sever using the wget command. wget https://vstsagentpackage.azureedge.net/agent/3.232.1/vsts-agent-linux-x64-3.232.1.tar.gz
You will need to do all of this from a non-root user with sudo permissions.
Next execute these commands to set up the server.mkdir myagent && cd myagent tar zxvf ~/Downloads/vsts-agent-linux-x64-3.232.1.tar.gz
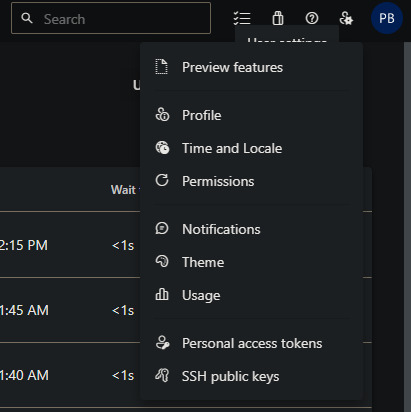
Now you will need to configure your personal access token in Azure DevOps. This PAT is going to be the password that allows your agent to receive code and commands from Azure DevOps.
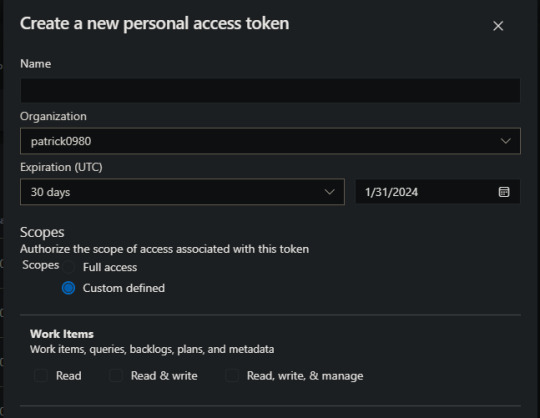
Note that a PAT will expire after a set amount of time you can define. You can set it to never expire, but you really shouldn’t.
Take a note of your PAT, you won’t be able to see it again after this. Also, take a note of your DevOps URL, it should look like dev.azure.com/patrick0980
Next, connect to your pipeline agent server over SSH. You will run the following commands.cd myagent ./config.sh
This will guide you through the install process. You will be asked for your DevOps URL and PAT, so have those ready.
Once you’ve finished filling out the forum for the installer, it will be present on your system. We’re almost there!
The last thing we need to do is configure the pipeline agent to operate as a systemd service. This will allow it to run in the background on the server, so we won’t have to manually invoke it. To do that you will run the “svc.sh” script in the same directory you were just in../svc.sh
Conclusion
Azure DevOps is a great tool you can utilize to really automate a lot of things. The possibilities are endless – and you don’t have to pay an extra penny for it! I hope you found this guide useful and hope to make more content for you soon.
Have a great rest of your day!
0 notes
Text
Vsts is now azure devops
Vsts is now azure devops
Vsts is now azure devops Vsts is now azure devops Latest national news Vsts is now azure devops Azure DevOps (VSTS) – The current operating system is not capable of running this task, with “Azure File Copy” During daily operations and work in Azure DevOps, one of the many things I’m doing is building Docker images and doing related tasks. Since I run everything on Linux, and the Hosted Ubuntu…

View On WordPress
0 notes
Text

So, you guys probably know what VSTS and What Azure DevOps are, as you are in this article. I suppose you have a little idea about that. No? Let me tell you in short what is VSTS and What is Azure DevOps?
What is VSTS?
VSTS (Visual Studio Team Services) was a cloud-hosted extension that was run by Microsoft and assisted development teams with special tools and services. These services were for software programmers, tester and IT project developers. Now let’s move to the next part,
What is Azure DevOps?
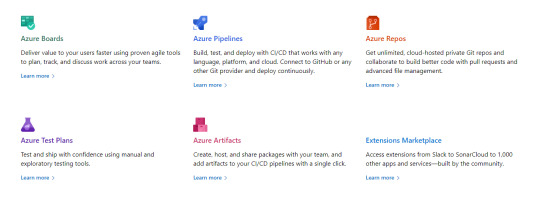
Azure DevOps is VSTS. Confusing, Huh? Not at all. Let me tell you, In 2018 Microsoft realized that VSTS is a very large platform where users might get confused with different tools. So they developed Azure DevOps. So now you have an idea that azure DevOps and VSTS are somewhat the same not fully but in some cases they are. According to Abel Wang, VSTS was one monolithic tool that did everything for the development of software They break VSTS into different tools, and now instead of just one monolithic tool, Microsoft has Azure Pipelines, Azure Repos, Azure Boards, Azure Artifacts, and Azure Test Plans. Now let me tell you how this works, Let’s say you have your code in GitHub and you are building it in Jenkins so won’t it be better if you use azure Pipeline? Like to release pipeline nothing will be better than Azure Pipelines. You can make your Test plans using Azure Test Plans, To track all of your work through the project you can use Azure Boards. So with the help of Azure DevOps, you can use whatever tool you want without using the Monolithic VSTS application. Also Read | Importance of Data Science in the Insurance Industry
What Differences Do They Make In Azure DevOps?
Azure DevOps is an evolution of VSTS. In 2018 Microsoft launched Azure DevOps and with that, they said that Development Operations are difficult to do and it is getting critical to a team’s success. They provided specific services to us and assured us that these tools will provide software faster and that too with higher quality. Let’s get to know these changes one by one.
Azure Pipelines
Azure Pipelines is Basically a CI/CD which works with any programming language, platform, or even a cloud. It connects with GitHub and deploys continuously.
Azure Boards
Azure Boards uses Kanban Boards, Backlogs, Team Dashboards custom reporting, and with the help of all of this Azure boards give you the exact tracking of your work.
Azure Artifacts
It gives you package feeds for different public and private sources.
Azure Repos
It is a private Git Repos for your project. By its name, it is identical that it provides a good repo to your business through Advanced file management and collaborative pull requests.
Azure Test Plans
With Azure Test Plans you will be able to do any kind of test, your one-stop solution for your Tests. All these Azure DevOps Services are open and also extensible. If you are working with a Framework, Platform, or even a cloud application, this software works smoothly for all of these. Also, it is possible that you use them separately or combined for all kinds of development solutions. As Azure supports both private and public cloud configurations, you will be able to run your data in your data center or their cloud too. It is possible and it is amazing. Also Read | Banks in the Metaverse: Why to Get In Early and 3 Ways to Start
What Kind Of Changes Will Be There In Azure DevOps?
Azure DevOps is nothing but the evolution of VSTS. The former VSTS users will get upgraded into Azure DevOps Automatically. Azure DevOps will give more choices and functions to existing users, so it is 0 loss and 100% gain for former users. The URL is changed from abc.visualstudio.com to dev.azure.com/abc. They have also made this easier for new users who just search visualstudio.com, they redirected this link to Azure DevOps.
As a part of this, the user will get an updated experience. Users of the Team Foundation Server will get updates based on features live in Azure DevOps. The Next version of TFS will be called DevOps Server and will get continue the enhanced updates and Services.
Conclusion
The change is necessary, But with Care. With this motive, Microsoft has perfectly relaunched VSTS with a new name which is Azure DevOps. Azure DevOps is a one-stop solution for every kind of Software Development. With Azure’s Pipelines, Boards, Artifacts, Repos and Test Plans you can design your application or website with ease. You can also use all of these tools in Azure DevOps simatenoiusly but you won’t be calling it VSTS. If you are building a website from a scratch you must use all of these application. It will really help your business.
Also Read
How is Google Search Implementing Artificial Intelligence?
7 Roles of Data Analytics in Video Games Development
How Artificial Intelligence can Enhance the Education Industry in 2022
Top 10 Keys Benefits of Cloud Automation in The Healthcare Industry
How Can Big Data Analytics Help Businesses to Become Data-Driven?
Original Source : Azure DevOps Is New VSTS - HData Systems
#azure#azure devops#data science#big data#visual studio#business#startups#entrepreneur#artificial intelligence#business intelligence#data analytics#data mining
6 notes
·
View notes
Text
VSTS Name Change in Azure DevOps Effects on Git Repositories - #Ankaa
VSTS Name Change in Azure DevOps Effects on Git Repositories As I’ve said in the past, it is super easy to build a VSTS Build (now Azure DevOps Pipeline) to keep two repositories in sync. In that article, one of the steps is pushing the new code to the destination repositories with a URL... https://ankaa-pmo.com/vsts-name-change-in-azure-devops-effects-on-git-repositories/ #Azure_Devops #Devops #Git #Tutorial #Vsts
1 note
·
View note
Text

Azure DevOps is the evolution of VSTS (Visual Studio Team Service) using its own tools to build and develop a product in an efficient manner.
Looking for Azure #DevOps Services training with an expert live instructor? We have trained multiple students. #hachion provides Azure DevOps Services Training that can be delivered online anywhere in the world with a live instructor. #Azure DevOps provides developer #services to support teams to plan work, collaborate on code development, and build and deploy applications.
Start Learning with Free Demo Today: https://forms.gle/koro1o6hBQyrvCvz7
Whatsapp now at https://wa.me/17324852499
Email: [email protected]
#onlineclasses #onlinetrainings #onlinecourses #Azure #azurecloud #azureonlinetraining #hachion
0 notes
Text
Getting started with DevOps using Azure DevOps & Docker

Getting started with DevOps using Azure DevOps & Docker Getting started with DevOps using Azure DevOps & Docker Docker and DevOps tools are becoming essential requirements in today’s software development. Developers could feel the urge to learn it and students should be prepared for it from now. If you hear lots of talks about these two technologies and you have a sort of clear idea how should it work theoretically, but you want to see it in action and start experimenting it yourself? Then, this course is for you! It is all practical, no slides, no time wasted. I get you direct to the point, in just 1 hour! Content: 1. Install Docker for Linux (or Windows) 2. Create a sample ASP.NET Core Web App 3. Run Web App on Docker 3.1 Pull Docker images from Docker Hub 3.2 Create Dockerfile 3.3 Build Docker image 3.4 Run Docker image 3.5. Dockerignore file (coming soon) 4. Tag the image 5. Push image to Docker Hub 6. Pull the image from Docker Hub 7. Create Web App for Containers on Azure 8. CI with VSTS 8.a Publish source code to Github 8.b create a CI pipeline 8.c Add task: Build Image 8.d Add task: Push Image 8.e Enable CI trigger 9. CD with VSTS 9.a Configuring the artifacts 9.b Enabling Continuous Deployment trigger 9.c Configuring the environments : Dev, Staging & Prod 10 Run the CI & CD pipelines 11 Working with docker-compose.yml Read the full article
0 notes
Text
Using Git Flow with GitKraken and Azure DevOps
In this post I want to explain how using Git Flow with GitKraken and Azure DevOps. Also, I give you an idea why these tools combined can help us in many areas including collaboration, git concept learning curve, code quality, code consistency, and code stability. If you want more information how to use Azure Resource Groups, look at this post. If you are looking for an idea how to transform your company in a new digital scenario, I wrote this post.
Teamwork
Having multiple developers working on the same projects isn’t always easy especially when you try to not step on each other’s feet. A new coder on the team can break the project branch with one wrong commit and affect all other members. Which sometimes ends with stressful and complete chaos for a short (sometimes long) period time on the entire team. Unit Tests can’t be done on dev because the feature isn’t completed yet. What features are being worked on and by who.
Git Flow to the rescue
With GitFlow branching strategy and some settings on Dev Ops no commits can be done directly on the develop branch. Each developer is required to create a feature branch off the develop branch. All work related to the feature they are working on will be done there. Once a feature is considered done, the developer has to create a pull request to merge their feature into the develop branch. Their pull request then has to be reviewed and approved by the project lead, or another member of the team.
Pros we see:
It forces the project to be split into little features
Corrupted commits don’t affect other team members
Dev can easily relate their feature (pull request) with bugs, tasks, and stories
Dev branch will receive only approved code (more stable, less potential bugs)
Code Review
Even as a small company, we struggle to find the right process to perform code reviews. It can be hard to find a tool to review commits correctly or easily provide feedback on the developer’s code you are reviewing. Azure DevOps offer a smart and very user-friendly way to remedy that challenge and it was a huge success using this feature during our last project.
Pull Request & Azure DevOps to the rescue
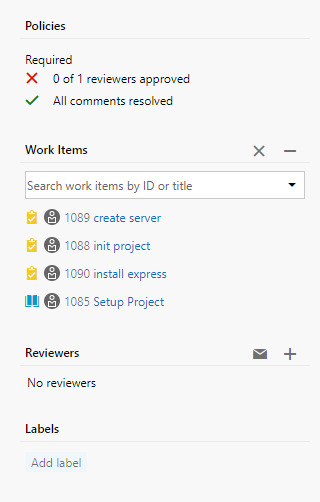
As mentioned in the previous point. Once a feature is considered done the developer has to create a pull request asking his feature to be merged to the develop branch. With a few settings on Azure DevOps, we can set multiple criteria for a pull request to be approved.
Be approved by one or multiple team members
The project has to build with no errors
All code review comments must be resolved
One or more work items must be associated with the pull request
This gave us an incredible way to keep the code consistent, easily explain to your peers what is wrong with their code or approach and at the end lower the number of bugs present in the application.
Definition & Tool
Git
Git is a free and open source distributed version control system designed to handle everything from small to very large projects with speed and efficiency.
Git is easy to learn and has a tiny footprint with lightning fast performance. It outclasses SCM tools like Subversion, CVS, Perforce, and ClearCase with features like cheap local branching, convenient staging areas, and multiple workflows.
Why git is called a distributed source control system?
This is very important and probably one of the biggest mindsets changes we had to do from switching from TFS to Git.
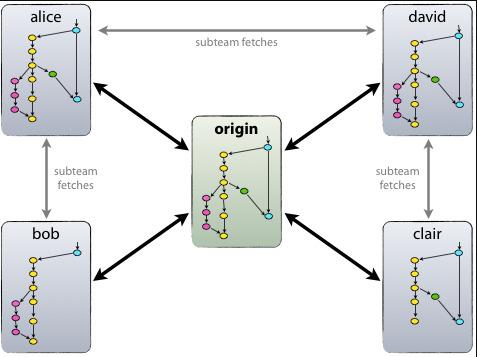
A distributed source control system has each user create a copy or clone of a repository on their local machine. All commits made by the user are done so only on their local repository and not directly to the origin repository (server). To synchronize changes between a client and origin repository the user performs, pull and push commands. This allows the user to work independently of others. Then pushing their changes and pulling in the most recent changes when they need to.
In the figure below we have the origin repository while each user has their own repository. With changes being synced back and forth between the origin.
Azure DevOps
Azure DevOps formerly known as (VSTS) is a recent continuous integration (CI) and continuous delivery (CD) service provided by Microsoft. It works with any managed Git provider and can deploy to most major cloud services, which allow for Azure services. Azure DevOps provides pipelines to configure and automate builds and releases to different environments. These pipelines can be in YAML or as visual models in the Azure DevOps webpages. Azure DevOps is a fast way to automate build (CI) and deploy (CD) projects and make them available to users. source
GitKraken
GitKraken is a Git GUI client for Windows, Mac, and Linux. It helps developers become more productive and efficient with Git. It’s free for non-commercial use. (Need a Pro license to connect to Azure Devops)
GitKraken simplifies complicated commands into drag and drop actions. It makes working with remote repositories easier through integrations with GitHub, Bitbucket and GitLab. It allows you to resolve merge conflicts without ever leaving the app. And it supports Gitflow, Git Hooks, LFS, and more
Official site https://www.gitkraken.com/git-client

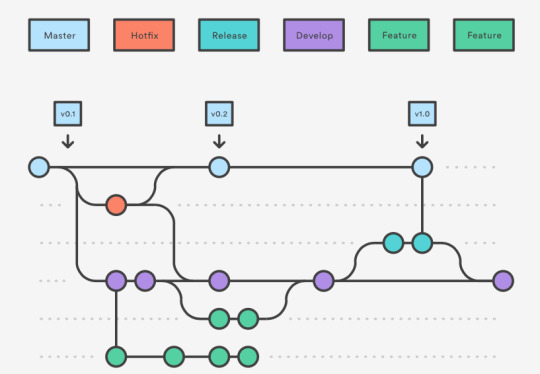
GitFlow
GitFlow is a branching model for Git, created by Vincent Driessen. It has attracted a lot of attention because it is very well suited to collaboration and scaling the development team.
Key Benefits
Parallel Development
One of the great things about GitFlow is that it makes parallel development very easy, by isolating new development from finished work. New development (such as features and non-emergency bug fixes) is done in feature branches, and is only merged back into main body of code when the developer(s) is happy that the code is ready for release.
Although interruptions are a BadThing(tm), if you are asked to switch from one task to another, all you need to do is commit your changes and then create a new feature branch for your new task. When that task is done, just checkout your original feature branch and you can continue where you left off.
Collaboration
Feature branches also make it easier for two or more developers to collaborate on the same feature, because each feature branch is a sandbox where the only changes are the changes necessary to get the new feature working. That makes it very easy to see and follow what each collaborator is doing.
Release Staging Area
As new development is completed, it gets merged back into the develop branch, which is a staging area for all completed features that haven’t yet been released. So, when the next release is branched off of develop, it will automatically contain all of the new stuff that has been finished.
Support for Emergency Fixes
GitFlow supports hotfix branches – branches made from a tagged release. You can use these to make an emergency change, safe in the knowledge that the hotfix will only contain your emergency fix. There’s no risk that you’ll accidentally merge in new development at the same time.
Environment Setup
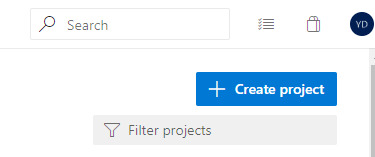
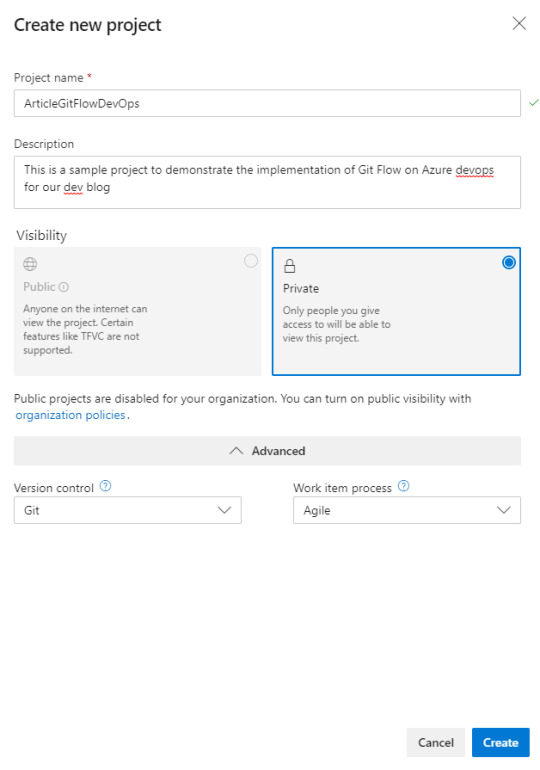
Create a new project
First thing let’s create a new project on Azure DevOps. Of course, you have to make sure the version control is set to Git. The other options can be set to your preferences.
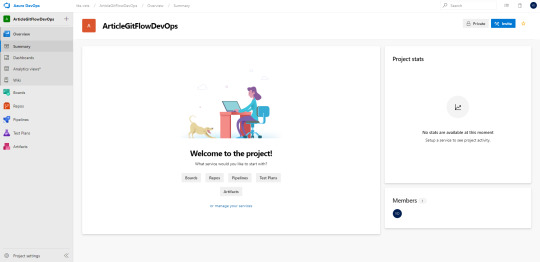
Welcome to your newly created project.
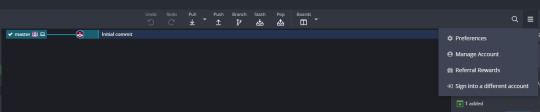
Connect GitKraken to Azure DevOps
First thing is to connect GitKraken to your Azure DevOps. For that, you are going to need to create a Token
When opening GitKraken you should see Azure DevOps option available (Pro Version)
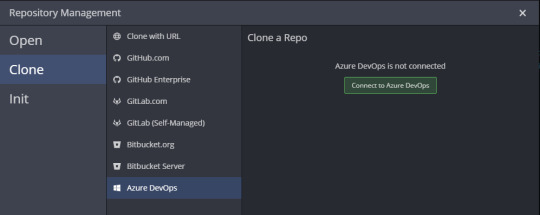
Enter your devops url and click “Generate a token on Azure DevOps”.
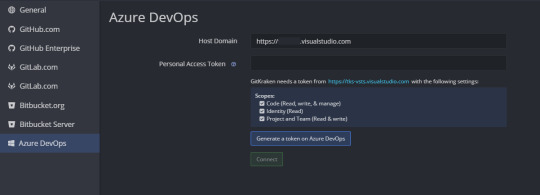
You will be redirected to your AzureDevOps personal setting and will be invited to create a new Token
Give it a name and depending on your preferences you can set a maximum of one-year validity.
Then switch to a full access scope.
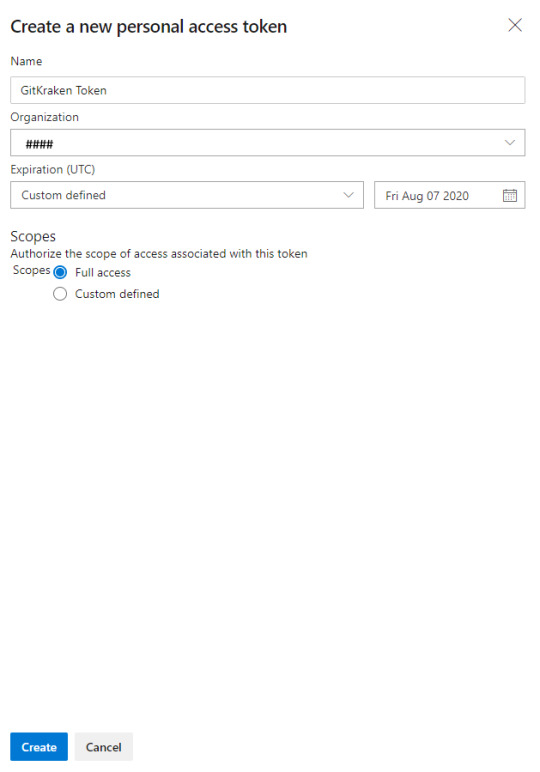
Once you click on create Azure DevOps will give you a Token to copy.
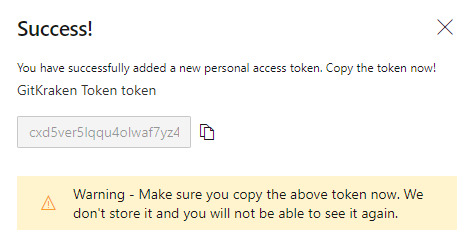
Copy that token and return to GitKraken to past it.
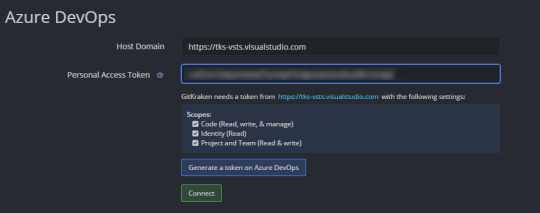
Once you click on Connect you should see your token
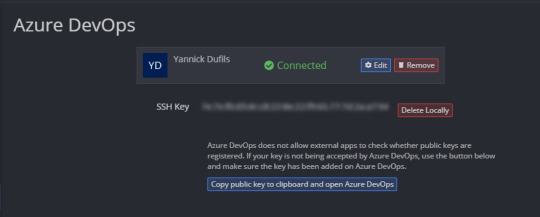
You can then make sure SSH Key has been correctly added to your DevOps SSH public keys
Now your GitKraken is successfully connected to your Azure DevOps
Clone your Git Repo from GitKraken
Now you are connected to your DevOps organization you can clone your newly created project.
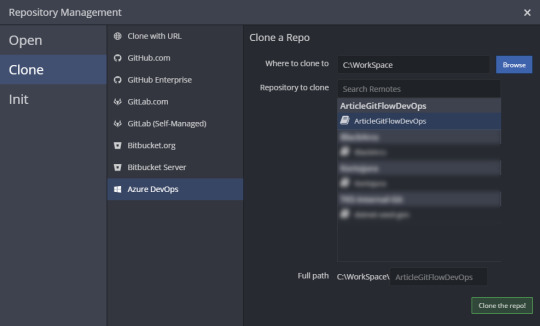
GitKraken will clone to the location you indicated and invite you to do an initial commit to initialize the repo.

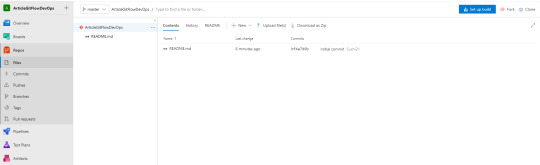
Once the initial commit is done you should see the following screen

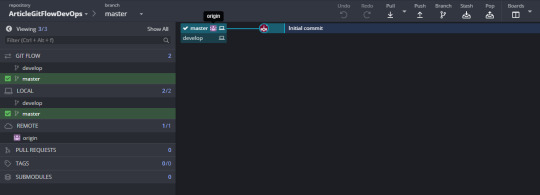
To confirm that you repo was correctly initialize. You can navigate to the Repos tab of your project on DevOps and you should see a master branch with a readme file in it.
Initialize Git Flow branches from GitKraken.
We are now going to initialize the Git Flow branching strategy with the help of GitKraken. It will give you a quick way to create new branches (develop, features, releases or hotfixes.)
From GitKraken open the Preferences
And then reach the Git Flow menu

Then click on Initialize Git Flow
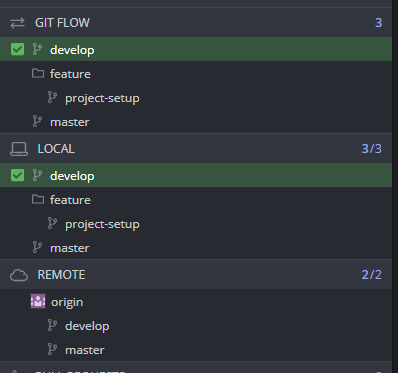
You will see now that new menu appeared on your GitKraken main screen but also develop branch was created locally.
As mentioned earlier Git is a distributed source code repository
For now, develop is only on your local machine. That’s why we can’t see it on the remote yet. It needs to be pushed.
On GitKraken you can see what is on remote and what is on local by checking little icon. Little computer is where local is and the DevOps team logo is where remote is.
On the screenshot bellow, I need to push my local to remote if I want to init the develop branch.
And that’s the beauty of Git. You can do as many checking you want locally before sharing it with the rest of the team.
First, you need to checkout the development for Git to point to this branch.
Normally with command line, it would be done by
git checkout develop
Within GitKraken you can simply double click on the develop from Main area or left panel.
Now develop should be focused.
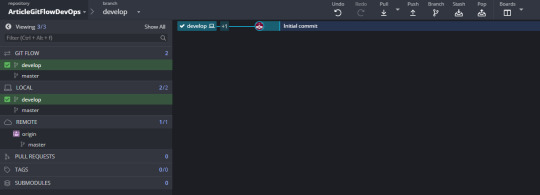
Now you can click push to push all the develop changes from local to origin. This will create the branch on the server.
Unless you want to rename anything or have multiple remote you can confirm by clicking submit.

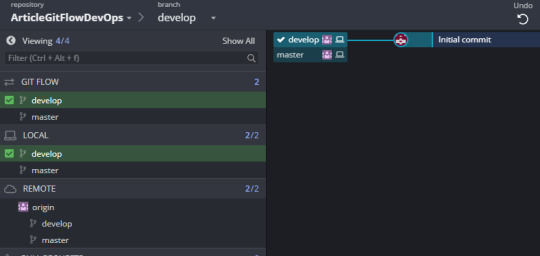
If everything went well you should be able to see the develop branch on remoteand logo from team should be also beside develop.
Setting Branch Policies and Pull Request
As mentioned earlier we want to block people from pushing directly to the develop branch forcing them to create pull request and also setting some rules for a pull request to be approved. (like can’t be approved by yourself and so on.)
Go on Repo-> Branches menu of Azure Devops
You should see the two branches master and develop
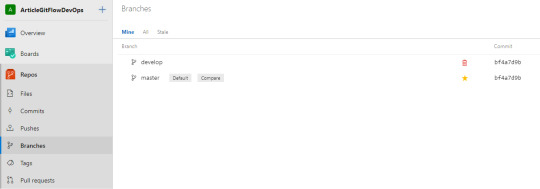
First, little thing to do (optional) is setting the develop branch as the Compare one. Then all the features branch will take the develop branch as a comparation reference and show how many commits behind or ahead it is.
Click on the 3 dots and then Set as compare branch
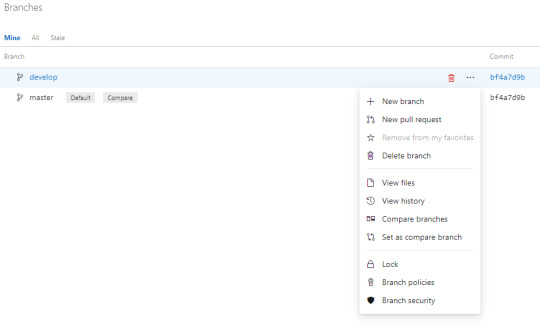
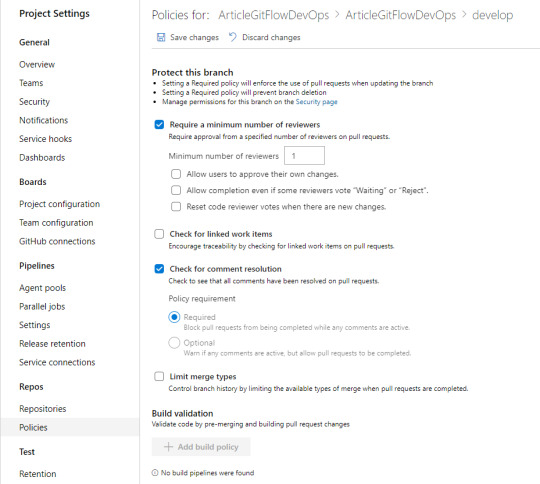
Then we want to setup Branch Policies by again clicking the 3 dots and then Branch policies
You can now set the rules as you wish.
Having Reviewers
Linked work items
Resolved Comments
Merge type
Build validation (we will do a tutorial on this topic as well)
etc
As mention in the disclaimer of that page setting rules will automatically apply the following.

For the purpose of this tutorial I’m going to activate only a reviewer and comment being set to resolve. (I can approve my own pull request but it is for this tutorial purpose)
Here is option example:
Congratulations! Your environment is now ready to use and setup correctly.
WorkFlow in Action
Starting a feature
Now we are starting a new project which will be a small API made with node.js.
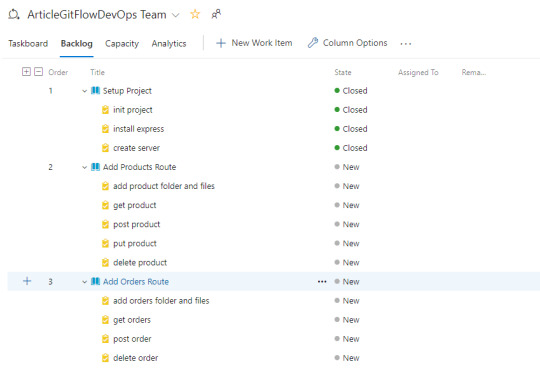
Let say you have all your user stories setup with tasks on DevOps
The first feature I’m going to work on is project setup. (note here the project is a sample one very small but normal features are a group of one or multiple tasks and not user storied like this example.)
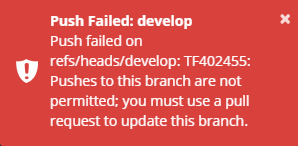
Just to confirm my setting applied. I’m trying to commit my initial files to the develop branch

I am able to push against dev locally but when trying to push on remote I have the following message
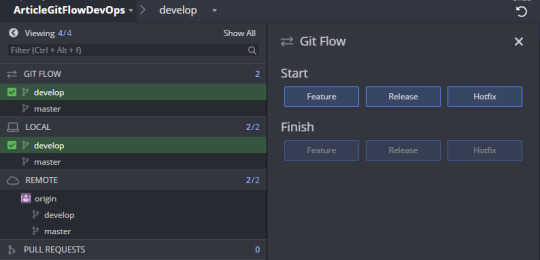
Creating a feature from GitKraken
Click on Open GitFlow panel on the left panel of GitKraken

Select Start New Feature
Then type the name of the feature and click start feature
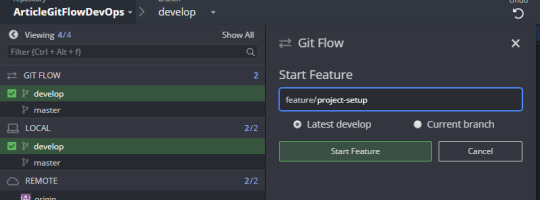
Now we can see that we have a local feature folder created with a project-setup branch in it (only locally for now). I can now push my changes to that local feature branch.
Notice that Gitkraken has a nice code comparison tool with different types of view including side by side view.
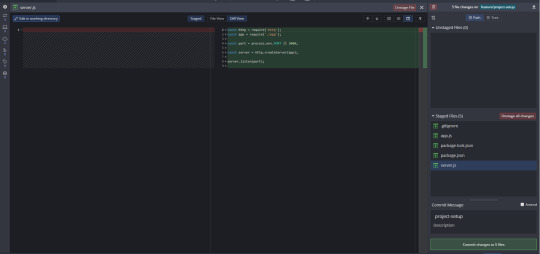
We can now as manycommit we want on our local branch. When a feature is done or when we want to share progression we can push all the changes to remote
Create Pull Request with GitKraken
Now it is time to ask for the feature to be merged with develop branch.
Of course, pull request can be created on dev ops directly, command line etc.
Here we are going to create a pull request via GitKraken.
Two ways of doing it.
Click Create pull request menu
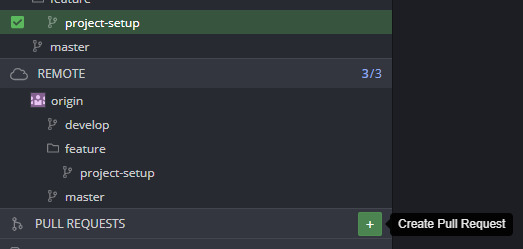
Or Drag and Dropping the feature branch to develop
We can enter the information we want and then create the pull request.
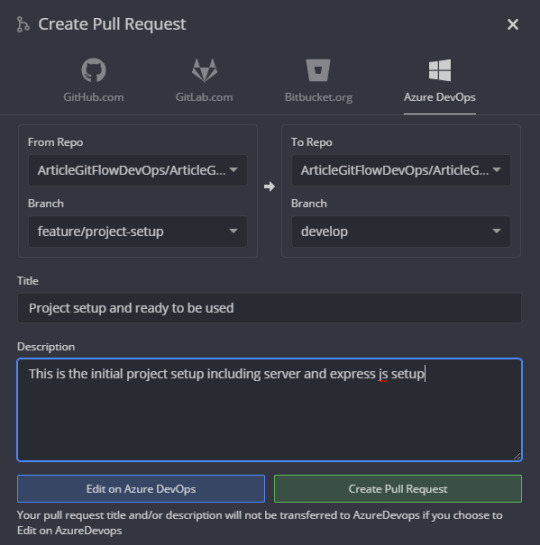
You can now view your pull request on azure. It needs now to be approved to be merged on develop
Pull Request on Azure Devops
General View
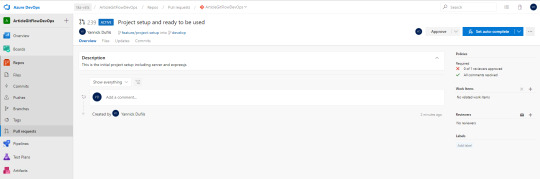
Adding Work Items
You can now add work items related to the pull request (they can be automatically close when pull request is approved )
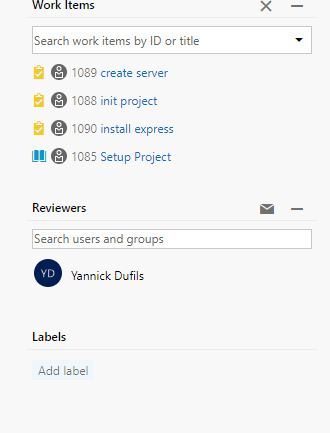
Adding Reviewers
Reviewers can be set and they will receive a notification via email automatically
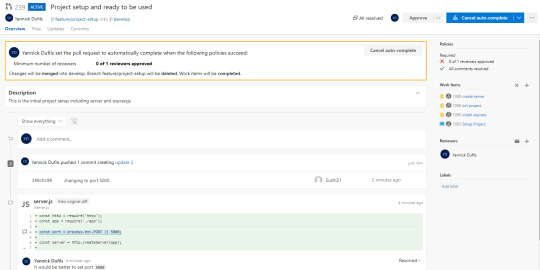
Set auto-complete
One nice feature is you can set some rules whenever the PR is approved like
Deleting feature branch automatically
Set related work items to be resolved, completed, closed …
Merge Type

Now Pull Request is fully setup and is waiting to be approved
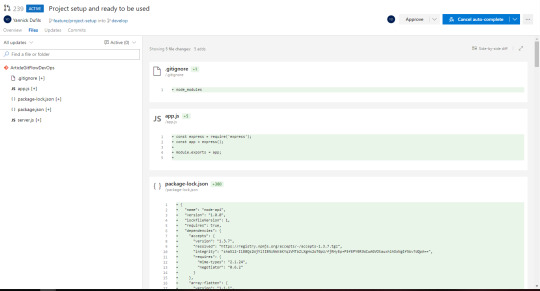
Pull Request Approval and Code Review
As a reviewer, you will have all you need to see what was done for that feature.
Azure devops provide a nice and easy way to review and give feedback on your peers’ code.
Indeed, in one view only you can scroll through all the changes at once.
Feedback on code
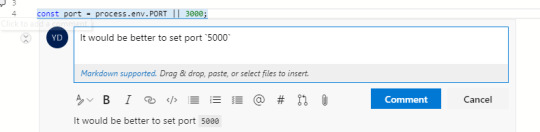
As mentioned, reviewers and any people can leave a comment on a specific line of code or an entire file.
Entire file

Specific line
A nice feature is the fact that comments can be rich and including many formatting/tagging/images/Pull Request or items reference and much more.
Now a comment is posted we can see on the PR timeline a policy that it doesn’t comply to rules of having all comments resolved
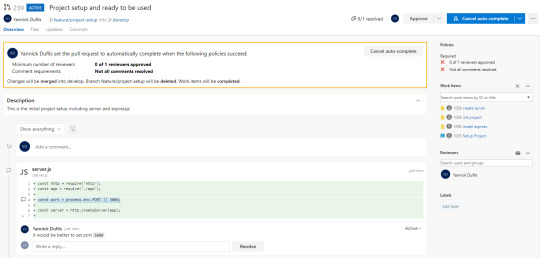
The developer will be notified about the comment and make the required changes or reply to the comment
He can push his new changes and reply to the comment by tagging the reviewer for example.
The new commit will appear in the Pull Request timeline
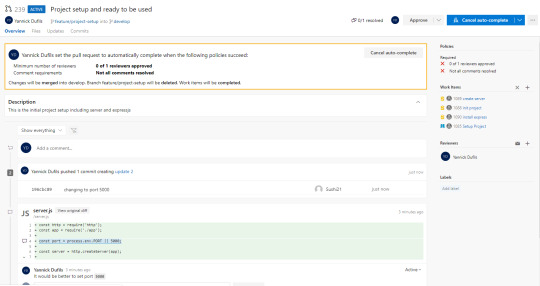
If change is good then the reviewer can now resolve the comment
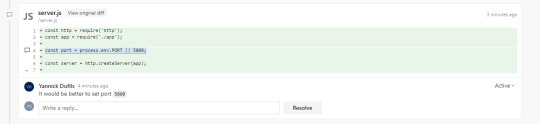
Now Pull Request is ready to approve. The reviewer can click on Approve.
The PR will now indicate that the changes will be merged into develop.

Once Merge being completed the Pull Request will be set to completed
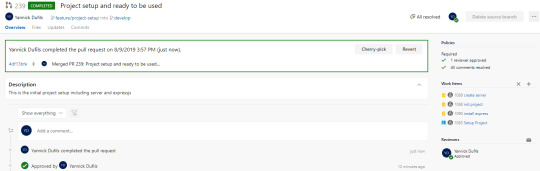
We can also notice the Tasks and User Story being closed automatically
Finally, we can visually see the merge happened in GitKraken

Notice also that feature branch was deleted from remote. To keep things clean it is better to delete it also locally
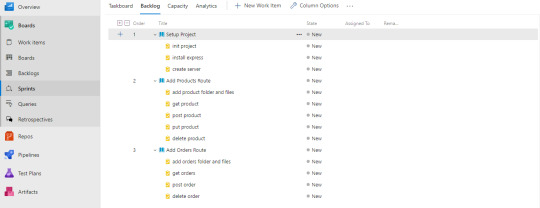
Multiple Features / Conflicts
Now any developers can start there one feature without affecting the develop branch
In the following example, we can see 2 features going on products and orders
Following the previous pull request creation sequence each feature will have its pull request once completed.
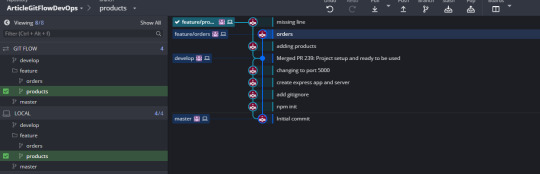
We can see that develop now is behind and can be tested with the previous request being approved
We will end with pull request for each feature

It can happen that the order of Pull Request being approved and changes may trigger conflicts.
For example, while working on orders feature (product and many others were already done.) Two developers changed the application variable name.
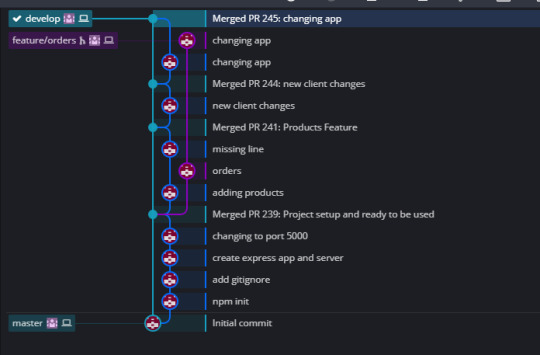
Result being Pull Request indicating that there is a conflict
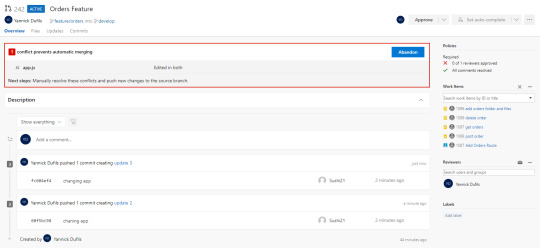
Merging and Resolving Conflicts using GitKraken
To have pull request completed and conflicts resolved. The developer needs to merge all the develop changed into its feature.
In that case, we are going to merge develop into feature\order
It can be done by drag and dropping develop on the feature branch
Then the conflict will be detected

Clicking view conflicts will show all the files that cause the conflicts
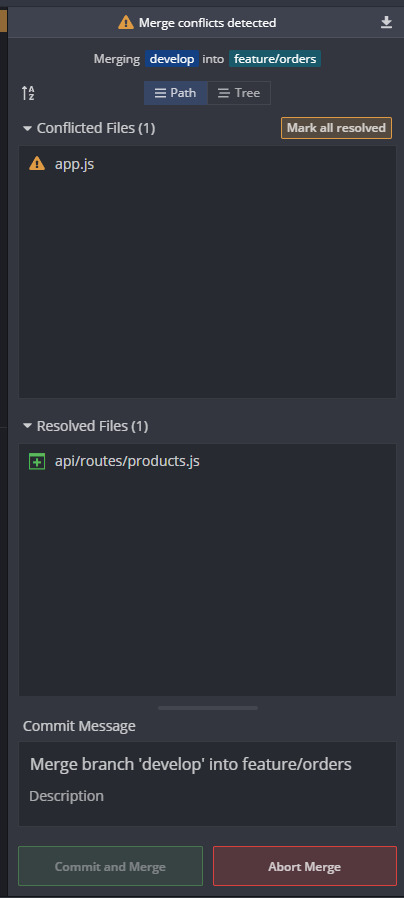
You can click on each file and have access to a very user friendly editor where you can select or exclude any line or even edit the output as needed

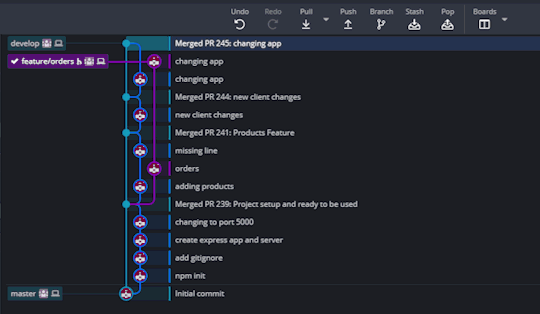
Once conflicts edited click on save Now Merge is ready to Commit and Merge
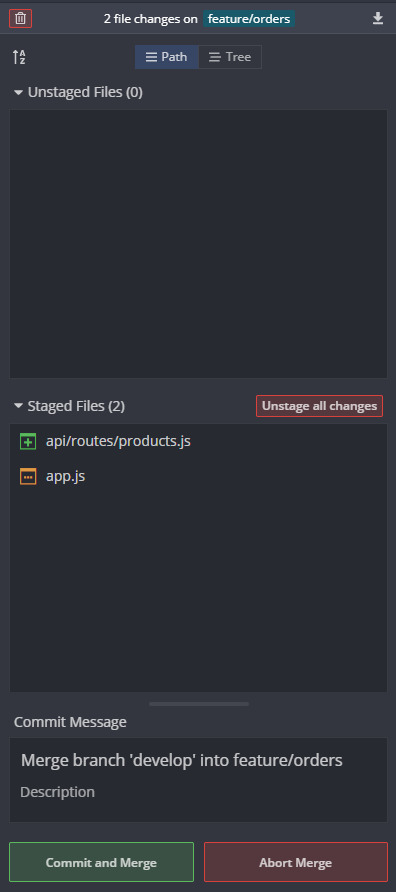
Once commit is pushed. The Pull Request will be ready to be completed.
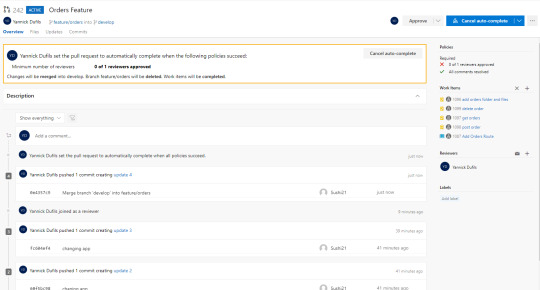
Once completed you can see how dev once merge before feature being merged itself in develop

Conclusion
In conclusion, this is the recap of how Using Git Flow with GitKraken and Azure DevOps. We did a retrospective on this project and all the team members agreed by saying this workflow really help the project and all its participants. All devs have a different level of experiences and different preferences but everyone agreed this was the way to go to work together.
GitKraken really simplifies everything when it comes to deal with all the Git concepts without using a console any single time. This is definitely a tool we want to keep in our work and it will be hard to go back on other code source repositories like TFS or SVN.
Having Git Flow and Pull Request policies in place was a bit challenging at first but in the end, we were always able to provide nice and smooth feedback on each other code which ended with much more consistent and solid code without enforcing strict coding style policy.
Azure Devops is a must-have for us now. Everything is very user friendly and the number of things we can do with this tool is amazing. One of the policies we had for pull request was the application being able to build (.NET core api + angular). We didn’t have last-minute bad surprise we an application not able to build for production and not being able to deploy.
The post Using Git Flow with GitKraken and Azure DevOps appeared first on PureSourceCode.
from WordPress https://www.puresourcecode.com/tools/azure-tools/using-git-flow-with-gitkraken-and-azure-devops/
0 notes
Text
Vsts is now azure devops
Vsts is now azure devops
Vsts is now azure devops Vsts is now azure devops National news headlines Vsts is now azure devops DanielStocker.Net If you are a Visual Studio Team Services user you will no doubt have seen the announcements around Azure DevOps. I wanted to put a blog article out to document the largest changes. What’s important to remember her is that “it is really just a rename”. Below is a summary of the…

View On WordPress
0 notes
Text
Exploring .NET Core's SourceLink - Stepping into the Source Code of NuGet packages you don't own
According to https://github.com/dotnet/sourcelink, SourceLink "enables a great source debugging experience for your users, by adding source control metadata to your built assets."
Sound fantastic. I download a NuGet to use something like Json.NET or whatever all the time, I'd love to be able to "Step Into" the source even if I don't have laying around. Per the GitHub, it's both language and source control agnostic. I read that to mean "not just C# and not just GitHub."
Visual Studio 15.3+ supports reading SourceLink information from symbols while debugging. It downloads and displays the appropriate commit-specific source for users, such as from raw.githubusercontent, enabling breakpoints and all other sources debugging experience on arbitrary NuGet dependencies. Visual Studio 15.7+ supports downloading source files from private GitHub and Azure DevOps (former VSTS) repositories that require authentication.
Looks like Cameron Taggart did the original implementation and then the .NET team worked with Cameron and the .NET Foundation to make the current version. Also cool.
Let me see if this really works and how easy (or not) it is.
I'm going to make a little library using the 5 year old Pseudointernationalizer from here. Fortunately the main function is pretty pure and drops into a .NET Standard library neatly.
I'll put this on GitHub, so I will include "PublishRepositoryUrl" and "EmbedUntrackedSources" as well as including the PDBs. So far my CSPROJ looks like this:
<Project Sdk="Microsoft.NET.Sdk"> <PropertyGroup> <TargetFramework>netstandard2.0</TargetFramework> <PublishRepositoryUrl>true</PublishRepositoryUrl> <EmbedUntrackedSources>true</EmbedUntrackedSources> <AllowedOutputExtensionsInPackageBuildOutputFolder>$(AllowedOutputExtensionsInPackageBuildOutputFolder);.pdb</AllowedOutputExtensionsInPackageBuildOutputFolder> </PropertyGroup> </Project>
Pretty straightforward so far. As I am using GitHub I added this reference, but if I was using GitLab or BitBucket, etc, I would use that specific provider per the docs.
<ItemGroup> <PackageReference Include="Microsoft.SourceLink.GitHub" Version="1.0.0-beta-63127-02" PrivateAssets="All"/> </ItemGroup>
Now I'll pack up my project as a NuGet package.
D:\github\SourceLinkTest\PsuedoizerCore [master ≡]> dotnet pack -c release Microsoft (R) Build Engine version 15.8.166+gd4e8d81a88 for .NET Core Copyright (C) Microsoft Corporation. All rights reserved. Restoring packages for D:\github\SourceLinkTest\PsuedoizerCore\PsuedoizerCore.csproj... Generating MSBuild file D:\github\SourceLinkTest\PsuedoizerCore\obj\PsuedoizerCore.csproj.nuget.g.props. Restore completed in 96.7 ms for D:\github\SourceLinkTest\PsuedoizerCore\PsuedoizerCore.csproj. PsuedoizerCore -> D:\github\SourceLinkTest\PsuedoizerCore\bin\release\netstandard2.0\PsuedoizerCore.dll Successfully created package 'D:\github\SourceLinkTest\PsuedoizerCore\bin\release\PsuedoizerCore.1.0.0.nupkg'.
Let's look inside the .nupkg as they are just ZIP files. Ah, check out the generated *.nuspec file that's inside!
<?xml version="1.0" encoding="utf-8"?> <package xmlns="http://schemas.microsoft.com/packaging/2012/06/nuspec.xsd"> <metadata> <id>PsuedoizerCore</id> <version>1.0.0</version> <authors>PsuedoizerCore</authors> <owners>PsuedoizerCore</owners> <requireLicenseAcceptance>false</requireLicenseAcceptance> <description>Package Description</description> <repository type="git" url="https://github.com/shanselman/PsuedoizerCore.git" commit="35024ca864cf306251a102fbca154b483b58a771" /> <dependencies> <group targetFramework=".NETStandard2.0" /> </dependencies> </metadata> </package>
See under repository it points back to the location AND commit hash for this binary! That means I can give it to you or a coworker and they'd be able to get to the source. But what's the consumption experience like? I'll go over and start a new Console app that CONSUMES my NuGet library package. To make totally sure that I don't accidentally pick up the source from my machine I'm going to delete the entire folder. This source code no longer exists on this machine.
I'm using a "local" NuGet Feed. In fact, it's just a folder. Check it out:
D:\github\SourceLinkTest\AConsumerConsole> dotnet add package PsuedoizerCore -s "c:\users\scott\desktop\LocalNuGetFeed" Writing C:\Users\scott\AppData\Local\Temp\tmpBECA.tmp info : Adding PackageReference for package 'PsuedoizerCore' into project 'D:\github\SourceLinkTest\AConsumerConsole\AConsumerConsole.csproj'. log : Restoring packages for D:\github\SourceLinkTest\AConsumerConsole\AConsumerConsole.csproj... info : GET https://api.nuget.org/v3-flatcontainer/psuedoizercore/index.json info : NotFound https://api.nuget.org/v3-flatcontainer/psuedoizercore/index.json 465ms log : Installing PsuedoizerCore 1.0.0. info : Package 'PsuedoizerCore' is compatible with all the specified frameworks in project 'D:\github\SourceLinkTest\AConsumerConsole\AConsumerConsole.csproj'. info : PackageReference for package 'PsuedoizerCore' version '1.0.0' added to file 'D:\github\SourceLinkTest\AConsumerConsole\AConsumerConsole.csproj'.
See how I used -s to point to an alternate source? I could also configure my NuGet feeds, be they local directories or internal servers with "dotnet new nugetconfig" and including my NuGet Servers in the order I want them searched.
Here is my little app:
using System; using Utils; namespace AConsumerConsole { class Program { static void Main(string[] args) { Console.WriteLine(Pseudoizer.ConvertToFakeInternationalized("Hello World!")); } } }
And the output is [Ħęľľő Ŵőřľđ! !!! !!!].
But can I step into it? I don't have the source remember...I'm using SourceLink.
In Visual Studio 2017 I confirm that SourceLink is enabled. This is the Portable PDB version of SourceLink, not the "SourceLink 1.0" that was "Enable Source Server Support." That only worked on Windows..
You'll also want to turn off "Just My Code" since, well, this isn't your code.
Now I'll start a Debug Session in my consumer app and hit F11 to Step Into the Library whose source I do not have!
Fantastic. It's going to get the source for me! Without git cloning the repository it will seamlessly let me continue my debugging session.
The temporary file ended up in C:\Users\scott\AppData\Local\SourceServer\4bbf4c0dc8560e42e656aa2150024c8e60b7f9b91b3823b7244d47931640a9b9 if you're interested. I'm able to just keep debugging as if I had the source...because I do! It came from the linked source.
Very cool. I'm going to keep digging into SourceLink and learning about it. It seems that if YOU have a library or published NuGet either inside your company OR out in the open source world that you absolutely should be using SourceLink.
You can even install the sourcelink global tool and test your .pdb files for greater insight.
D:\github\SourceLinkTest\PsuedoizerCore>dotnet tool install --global sourcelink D:\github\SourceLinkTest\PsuedoizerCore\bin\release\netstandard2.0>sourcelink print-urls PsuedoizerCore.pdb 43c83e7173f316e96db2d8345a3f963527269651 sha1 csharp D:\github\SourceLinkTest\PsuedoizerCore\Psuedoizer.cs https://raw.githubusercontent.com/shanselman/PsuedoizerCore/02c09baa8bfdee3b6cdf4be89bd98c8157b0bc08/Psuedoizer.cs bfafbaee93e85cd2e5e864bff949f60044313638 sha1 csharp C:\Users\scott\AppData\Local\Temp\.NETStandard,Version=v2.0.AssemblyAttributes.cs embedded
Think about how much easier consumers of your library will have it when debugging their apps! Your package is no longer a black box. Go set this up on your projects today.
Sponsor: Rider 2018.2 is here! Publishing to IIS, Docker support in the debugger, built-in spell checking, MacBook Touch Bar support, full C# 7.3 support, advanced Unity support, and more.
© 2018 Scott Hanselman. All rights reserved.


0 notes
Link
#VSTS is now @AzureDevOps: 5 services you can use together or independently, including Azure Pipelines for CI/CD - free for open source and available in the GitHub CI marketplace. Learn more: https://t.co/fApjw1FThY pic.twitter.com/GUato050Zg
— Azure DevOps (@AzureDevOps) September 10, 2018
0 notes
Text
RT @keesschollaart: I just released v4.0 of the @VSTS Extension 'ARM Outputs', now with support for complex outputs! https://t.co/mZ04YTjBFI Let me know if this is helpful or if you have some other feedback! https://t.co/9nnsSt182s #VSTS #DevOps #Azure @Azure #InfrastructureAsCode #cicd #release
I just released v4.0 of the @VSTS Extension 'ARM Outputs', now with support for complex outputs! https://t.co/mZ04YTjBFI Let me know if this is helpful or if you have some other feedback! https://t.co/9nnsSt182s#VSTS #DevOps #Azure @Azure #InfrastructureAsCode #cicd #release
— Kees Schollaart (@keesschollaart) September 3, 2018
from Twitter https://twitter.com/sstranger September 03, 2018 at 03:24PM via IFTTT
0 notes
Text
[Packt] WinOps – Continuous Delivery with Azure [Video]
In a step-by-step manner, set up continuous delivery, deployment, testing and monitoring with Visual Studio Team Services (VSTS) and Team Foundation Server 2018 (TFS) Video Description VSTS and TFS can help you plan and code your application, now it’s time to start looking at actually deploying your application in test and production environments. This video course shows you how to set up continuous integration, deployment, testing, monitoring and delivery and all of the essential elements of DevOps and OpsDev. We’ll start by looking at the vNext build system. You’ll learn how to create build definitions, configuration as code (YML) for your needs, and use hosted or private agents to make sure you have all the prerequisites available to build your containerized platforms. After that, you’ll extend your pipeline by autonomous deployment capabilities. You’ll see how to create the deployment pipeline across different environments, all while making sure that the necessary approvals and checks are in place. Adding continuous testing is the next step. You’ll learn how to add automation to both your build and release step. You’ll also look at using Azure to run automated (UI/API) and performance engineering load tests. Another important step in implementing your DevOps process is continuous insight through monitoring. Application Insights is an Artificial Intelligent enabled Microsoft’s solution when it comes to monitoring your applications. You will also see how Intelligent Automation (IA) through Robotic Process Automation (RPA) can help you detect problems in your application and how it can be utilized them to achieve continuous delivery. You can find all the relevant code files at the below Github link https://github.com/PacktPublishing/WinOps-Continuous-Delivery-with-Azure-V- Style and Approach This video takes a step-by-step approach, including hands-on virtual labs. What You Will Learn Use your build to set up Continuous Integration (CI). Automate your deployment pipeline to achieve Continuous Deployment (CD). Enable Continuous Testing (CT) ranging from component testing to full Business Process Automation (BPA). Shifting right with Continuous Monitoring (CM) using Application Insights to provide real-time insight. Introducing Intelligent Automation (IA) and Robotic Process Automation (RPA) to truly enable Continuous Delivery (CDD). Authors Jonathon Lee Wright Jonathon Wright is a strategic thought leader and distinguished technology evangelist. He specializes in emerging technologies, intelligent automation and cognitive adoption (deep learning), and has more than 20 years’ of international commercial experience within global organizations. He is currently the CTO for Digital-Assured.com based in Oxford in the UK, advocacy board director for various non for profit such as Vivit-Worldwide.org and is a representative of the European Commission on the topic of Artificial Intelligence (AI). Jonathon combines his practical experience and leadership with real-world insights behind the core principles and practices underpinning Enterprise AI, Smart Cities (IoT / C2X & I2X) and Robotic Process Automation (RPA). Thus, he is frequently in demand as a keynote speaker at international conferences such as TED, Gartner, Oracle, AISummit, Unicom, EuroSTAR, STAREast, and STARWest. Jonathon is the author of several award-winning books. source https://ttorial.com/winops-continuous-delivery-azure-video
source https://ttorialcom.tumblr.com/post/177087140733
0 notes
Text
Vsts is now azure devops
Vsts is now azure devops
Vsts is now azure devops Vsts is now azure devops News page Vsts is now azure devops Azure DevOps (VSTS) – The current operating system is not capable of running this task, with “Azure File Copy” During daily operations and work in Azure DevOps, one of the many things I’m doing is building Docker images and doing related tasks. Since I run everything on Linux, and the Hosted Ubuntu linux agent…

View On WordPress
0 notes
Text
C# devops
C# devops C# devops News headlines in english C# devops Rajeev Pentyala – Microsoft power platform blog Azure DevOps – Getting started by committing a C# console project to Repo and set Policies Those who are hearing ‘Azure DevOps Services’ for the first time, its formerly known as ‘Visual Studio Team Services (VSTS)’. And Team Foundation Server (TFS) is now called ‘Azure DevOps Server’. Below…

View On WordPress
0 notes
Text
Jmeter azure devops
Jmeter azure devops Jmeter azure devops Latest news Jmeter azure devops Configuring Jmeter Tests in VSTS/TFS (Azure DevOps) and publishing Results Ganesh Hegde Sep 17, 2018 · 5 min read Running Performance Tests part of CI/CD is now a days essential. Whenever we make changes to the code its important ensure our code changes doesn’t affect performance. JMeter is widely used tool for performance…

View On WordPress
0 notes